You're as sweet as a peach!


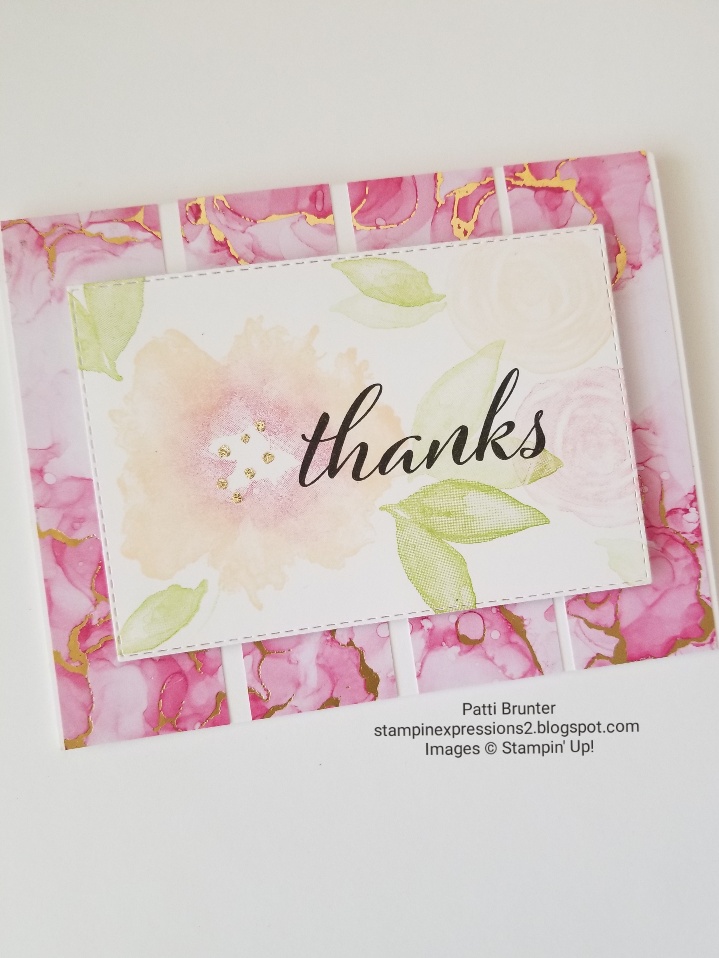
I am really loving the color palette of the new your a peach dsp. Even though I just used a small circle of it on this card, I used the color palette. For this card I used the sweet as a peach bundle. Doesn't it make the most delicious looking peaches? 


For the large peach I used pale papaya and calypso coral ink and as I have said before the trick is applying it with sponge daubers they really help to blend the inks and give dimension. The leaf was stamped with granny apple green. The greeting on the peach was stamped with stazon black ink and the other part of the greeting was white heat embossed on black card stock.


The side panel was stamped with the same colors ( I realized later I could have used some of the other designer series paper) Then I used the basic border dies to cut on one edge. I am really enjoying this set of dies. So many different uses for them! The card base is pale papaya which I stamped with versamark ink, this ink gives a subtle watermark look (it is also great for heat embossing).
Thanks for stopping by today! Have a blessed day!


Global Design Project #295


The global design project team has the theme, growing garden and I just couldn't resist using the large daisy garden stamp. I stamped with momento ink so that I could color with my stampin blends. I kept my coloring very simple with daffodil delightcajun crazemossy meadow and granny apple green blends. 


I did not want to cover up the beautiful stamp with a large greeting and so I used the one happy family stamp set and white heat embossed the greeting on black card stock.


Originally I was just going to use the stitched rectangle die to cut out the smaller image however, when I die cut it I thought about keeping the outer frame layer, cutting that with a large rectangle and using my dimensionals to pop up the center group of flowers. When I attached the greeting I put a dimensional on the end that hung over and attached the rest flat to the top layer. Check out the fun ideas that the global design project team has created and join in on the fun!

Check out the new paper pumpkin for this month! I bet this will be a big hit! Makes great masculine cards and I know that those are always hard. Can't wait to see what amazing cards this kit creates! 

  • Contains enough supplies to create twelve cards and coordinating envelopes.
  • Card size: 4-1/4” x 5-1/2” (10.8 x 14cm)
  • Envelope size: 4-1/2” x 5-3/4” (11.4 x 14.6 cm)
  • Comes with a Stampin’ Spot plus an exclusive Stamp Set.
  • Includes inspirational sentiments and adventure-themed imagery featuring these nature-inspired coordinating colors: Basic Black, Basic White, Bermuda Bay, Crushed Curry, Early Espresso, Flirty Flamingo, Garden Green, Granny Apple Green, Mango Melody, Night of Navy.


Have a Peachy day!


Isn't this peach look good enough to eat? It was so easy to create with the distinctive stamp set sweet as a peach bundle. I used my sponge daubers to apply calypso coral and pale papaya ink to the peach. I did the same for the leaves with pear pizzazz and old olive ink. The only difference was I swiped the side to make the marks like veins on the leaf. Made a fun effect.
 

I have been wanting to use the new plenty of pattern masks so I picked the one that looks like mermaid scales to me. I love this simple design. I used balmy blue ink with my blending brushes to create the ombre look. One tip I have for using the masks is to place your paper on the back and then use a piece of painters blue tape to secure on the sides. Keeps the paper from moving. I finished the card with a little scrap of your a peach designer series paper from the cards a made yesterday and stamped the greeting with pale papaya on a piece of basic white cardstock that was die cut with the stitched so sweetly dies. The color combo that I used for this card was from the designer series paper. Stampin' Up paper is a great resource for when you need a color combo.

Order your paper pumpkin today! Tomorrow is the last day to order this kit!


Peaches 2 ways


The cards for today show you how you can make the same layout for both a regular sized card (US) and one of the Stampin Up note cards. I used the sweet as a peach bundle and your a peach dsp. This paper has colors that are some of my favorite! I wanted to keep the card pretty simple. Lately, I have really been into simple cards. I used the new stitched greenery die on the piece of designer series paper. Isn't the subtle stitching so pretty?


For the note card I used the dies and the stamps to create the focal point. I added a little white bakers twine behind the greeting and a few artistry blooms sequins (love that adhesive back).


A few small dots of white chalk marker to add a little something to the center of the flowers.


For the large card I used the same supplies except for the white seam ribbon that I colored with my calypso coral ink pad and a sponge dauber. Another tip I shared before but wanted to remind you is if you would like to blend the colors on the stamp used the sponge dauber directly to the stamp. It also works really well with the distinctive stamps.


I stamped off a few of the flowers and leaves to stamp in the background. The greeting is gold heat embossed and die cut with the stitched so sweetly dies. The greeting is a little long for this die and so I had to put the die over one end and then the top plate only over half of the die, run it through and then move the die to cover the other side of the greeting and move until it fits into place from where you already cut. Put the top plate over that half and run through. The real key is to only put the top plate over the part you want to cut. I hope this makes sense. If you have questions let me know.


Don't forget that the paper pumpkin kit for this month is only available for a few more days. The last day to order is June 10th. Order today!


Birthday Hugs and Kisses


Isn't the sending hugs bundle adorable?  I kept this card really simple by white heat embossing it on smoky slate card stock and colored only a few of the elements with my watercolor pencils. Just because they say watercolor you do not have to use them with water, you can use them like you would any colored pencils. 


I die cut the letters with basic gray card stock 3 times to stack them for more dimension. The entire panel is die cut with the stitched rectangle dies. The large die in the hugs bundle is just beautiful and so I had to use it. I only die cut one in white and then cut it in half since I knew only part of it would be showing.


The in good taste dsp for the background looked great with all the grays. I could resist adding 2 of the smaller sentiments to make my card complete. Don't forget the specials below before they end!


With every $250 in orders you will receive an extra $25 on top of the regular hostess benefits. They can be all your order or they can be a combination of orders from you, your friends and your relatives. Let me know if you have any questions.


If you would like to get this paper pumpkin, you can order a one time kit today. It looks like it will be one of the favorites of the year! If you have any questions let me know. You need to order by June 10th to get this amazing new kit!


Many amazing deals, some items up to 50% off, but you have to act now before they are gone!


TGIF challenge #318


The TGIF challenge for this week is one I couldn't pass up. The designer take over by craft-somnia momma is stampin blends. I love every chance I get to color with my blends. Check out the designers fabulous uses of stampin blends. For my card I brought out the hey birthday chick bundle.  I love to color images that I stamped but I also wanted to share today that it is just as fun to color your images that you have die cut.


This bundle has some adorable dies and I couldn't resist adding a little color to this cute little fence. I kept it pretty simple and just added a little shading. I also colored one of my favorite new dies the basic border dies. This die set has one that looks like a row of clouds and so I used my balmy blue stampin blends to add a little color and dimension. If you do not have these dies yet you will want to get them, they are so fun and I know I will be using them a lot.


For the greeting I die cut the "happy birthday" in early espresso card stock and basic white card stock and off set them a little to give some dimension to the greeting.  The wood paper is from the in good taste designer series paper. I cut apart the panel and mounted it on early espresso card stock that I had die cut with stitched rectangle dies. I left a narrow gap between each panel of wood so that it would look like they were individual boards of wood.
Take some time today and pull out your stampin blends, it is so relaxing to sit and color. Don't forget to give coloring your die cut images as well as your stamped images. It brings them to a whole new level. Have a  blessed day and check out the fun over at TGIF challenges!
Just a reminder that the January- June mini catalog is retiring soon. So many great deals, some items up to 50 % off the regular price. You will want to act soon before they are gone!


Watercolor Wednesday returns


Welcome back to watercolor Wednesday. I have been a little busy lately and have not had time to blog. But now I am back! This was a really fun card to create. No skills necessary, which is why it was so fun. I white heat embossed the daisy garden stamp with white embossing powder. It is now sold as a pack of 3 basic colors which is really nice.
 

Then I taped my watercolor paper down to an old piece of chipboard (it actually was packaging from my paper pumpkin) with some blue painter tape. Then I wet the entire panel and dropped in color,  rich razzleberry and misty moonlight. I let it dry and then added a few more layers of color. I love the look of these 2 colors together! When it was all dry I splattered white ink refill.


The greeting is white heat embossed from the one happy family stamp set. (sorry the picture is a little fuzzy) I adore this sentiment! This stamp set is so wonderful if you need some fun greetings. So many great fonts also. I trimmed out the greeting with a little scrap of rich razzleberry and night of navy. ( great use of scraps!) Don't forget about the new paper pumpkin! It looks to be amazing and I am sure you will not want to miss this one. 


Expressions in ink


Photography does not do this paper justice! It is so beautiful and I had the hardest time cutting it up. It is part of the expressions in ink suite. All of the items are a must have! But if you just want the paper it is expressions in ink designer series paper. I believe that it is currently unavailable so if you would like send me a message and I will let you know when it is back in stock.


For the main panel I did a quick stamping with the artistically inked stamp set and cut out with the rectangle stitched dies. This stamp set is a distinktive set, which means that it looks more realistic when stamped. I find it easier to use my sponge daubers or my blending brushes to apply the ink.  It really gets into the grooves of the rubber stamp. For the large flower I used the new pale papaya and polished pink.


For the center of the flower I wanted some gold to go with the background paper and so I used the small dots stamp in the set and heat embossed it with heat and stick powder. One tip when you heat this powder you do not want to over heat, when you see the powder melt take the heat away. Then I pressed some gilded leafing to the melted powder. I wish I would have added a few more dots to really make it stand out. The leafing is really fun to play with. Let me know if you have tried it yet? Have a great day and I hope you stop back soon!


Watercolor Hugs


This bundle, sending hugs really had me hooked! I am having so much fun playing with it and I hope you are not tired of seeing samples. I still have a few more ideas. Is anyone else like me and when you start with a set you think of more ideas and so you forget all the other sets you have. That is happening to me with this bundle. I started by white heat embossing it on fluid 100 watercolor paper and then the fun began.


I picked melon mambo, cameo coral, daffodil delight, highland heather, bermuda bay and granny apple green refills. I put a little drop of each on an acrylic block and then using my water painters applied color. Letting the colors bleed into the colors next to each other but being careful they did not bleed into the colors opposite the color wheel (then I would get mud).


After my first layer of color I let the paper dry and then added 2 more layers.  Letting it dry so the colors would be more transparent. For the word "hugs" I was going to just let it stay with the colors but I felt that it got a little lost, so I decided to make it pop with die cutting the word 3 times and gluing together and mounting it all on the card. I kept the watercolor paper card size and mounted it all on a regular card.


Daisy Garden


I love a great background stamp for a quick and easy card! The new daisy garden stamp did not disappoint. I love this beautiful stamp! I had to give it a messy watercolor look for my first card. I stamped it with staz on ink on watercolor paper. You will want to use a stamparatus for this step, with all the detail in this stamp I wanted to get all the lines. With this I was able to stamp a few times.


My next step was to take my water painters and a few ink refills and start to add color. I let it dry completely between each layer so that I could get more depth in the colors. After it had dried I used the water painter so splatter left over ink and even some white ink refill on the entire panel.


Since the stamp set does not have any greetings I used one from the celebrate sunflowers stamp set. I white heat embossed it on basic grey cardstock and used my tailored tag punch to punch out. Finished up with a little white bakers twine. I had so much fun playing with this new stamp! Hope you enjoy this card!


Inspiring Iris (retired)


Hi I have another quick fun card that I wanted to share. The stamp set is retired but you could use the layout for a fun idea with stamps you might already have. I love to play with my ink refills and water. I had so much fun layering the colors for this card. The stamp set is the inspiring iris.
 

After I layered water and ink refills with my water painters and let it dry I added texture with embossing paste and the circle from the basic pattern mask. I forget how fun the embossing paste is. Thank you checking out my card. Enjoy!


Natural Shell


Hi! I am sharing a card I created before the new catalog came out. So a few of the things are retired. I thought I would share because the friends are like seashells bundle is still current. I think the only thing retired is the embossing folder. I love how this shell turned out! Such a fun technique. I sponged the large shell with calypso coral and crumb cake and then lightly misted it with water. Then quickly stamped the image.
 

The greeting is white heat embossed and cut with the stitched so sweetly dies. I used a little linen thread
that I wrapped around the back and tied a few knots at the ends to add a little more texture. I used the in good taste dsp for the background layer and used the retired wood planks embossing folder.  I love the colors of this card and I hope you do also. Thank you for stopping by and have a blessed day!