Heart Garden

I think this is the last card I have to share from Valentine's Day. This was made with some scraps from another project that I was making and so I wanted to make a planter for my heart flowers.


The planter box is made with a strip of in good taste dsp and I used a few small strips for the sides. For the sentiment I stamped with basic gray and then keeping it in the same spot in the stamparatus I stamped over with versamark ink and heat embossed with clear embossing powder. That is a easy way to emboss any color ink you may have.


I kept the card pretty simple finishing it with a linen thread bow, Thanks for stopping by and have a blessed day!


Paper pumpkin, don't miss out!


Leftover hearts


Hello, I wanted to show you a quick little card I created with leftover hearts from a card I made a while ago. (Sorry about the photo not sure why it turned out so dark) I used a heart that I had punched out for my heart template. Arranged the hearts and used mulitpurpose liquid glue to attach.


For the placement of the "love" I wanted to give you a little trick that helped me to space the letters as well as make them straight. I first placed the heart from the wreath builder dies with the letters already removed. I did not attach this, I just placed it down.


I placed a small amount of the multipurpose liquid glue on the letters (patting off any excess glue) and placed them in the holes for the letters. Then gently removed the large heart, making sure not to remove the letters. The take your pick tool is so helpful for this step. 


I also wanted to share a few tags that I made with more of the scraps that I had on my desk for Valentine gifts.


The clear tiny treat boxes are the perfect size for small candy.


The stitched shaped circle die is a retired paper and the everything else is from the arrange a wreath bundle. So fun and simple. I used a box that I had found  on clearance after Christmas, it actually has a snowflake behind this tag, but I really wanted a package that would hold 4 cupcakes so it worked perfect!


Strawberries, Blueberries and Raspberries!


Hi! I finally had a chance to play with my saleabration set berry blessings bundle today. It is 12x12 paper and a stamp set. All FREE with a $100 order! If you need supplies like card stock, ink refills, adhesive just get a list together and you will be happy you did! This set and paper is adorable. I made a few 3x3 cards and a gift box. So quick and easy.


I let the paper do most of the work for me. Cutting the 3x3 background layer and then using the sentiments from the stamp set. I cut them out with many of the die sets that I have but you could also just cut them with your paper trimmer. The paper has fruit on one side and then coordinating patterns on the reverse side. So making layers was easy.


The dies I used for sentiments and other layers were stitched shaped dies and rectangle dies.


For the mini pizza box (which holds 6- 3x3 cards and envelopes) I tried my ink blending on the rough side of the box. The pictures below show the box before I put it together. How different it looked before I put it together. When I folded the box some of the edges started to pull the color away so I splattered the box with white ink refill so that it would look like it was intentional. 


The sentiment on the cover is die cut with the stitched so sweetly dies and then I cut out some of the items from the cute designer series paper.


The box came together rather quickly. I love the way that it looks with the ink blending. I think it would look great if I used a stencil also.


The box put together before adding all the extra's.


The box after I finished ink blending with my blending brushes. If you do not have them yet make sure to order them! Thanks for stopping by today!


My love for Chocolate


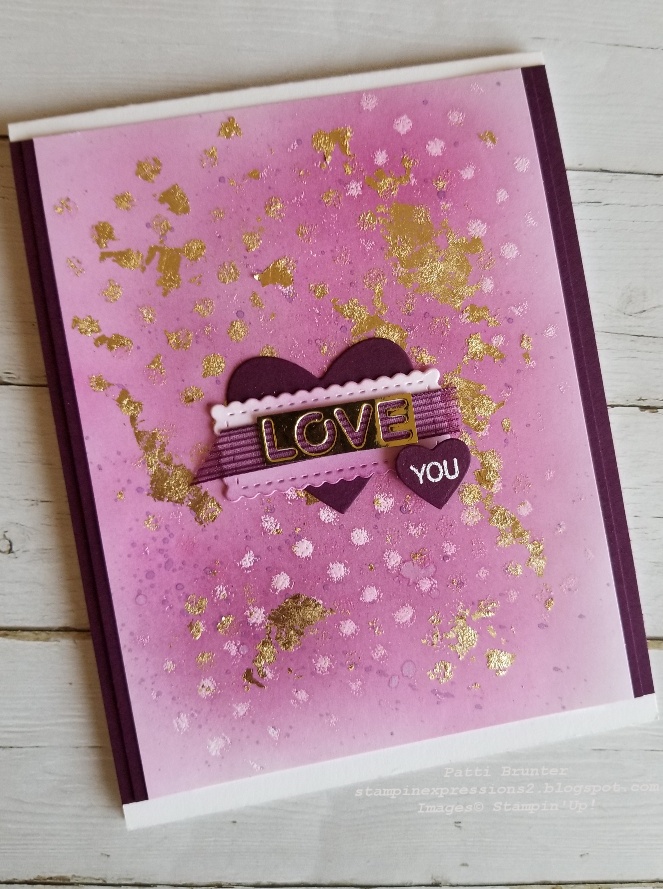
Happy Valentine's Day! My card today is the one that I made for my husband, he knows I love him an awful lot if it is more than chocolate (especially dark chocolate). Where are all my dark chocolate lovers? So I knew this card would mean a lot to him, if I picked him over a nice chunk of dark chocolate. I started with the 
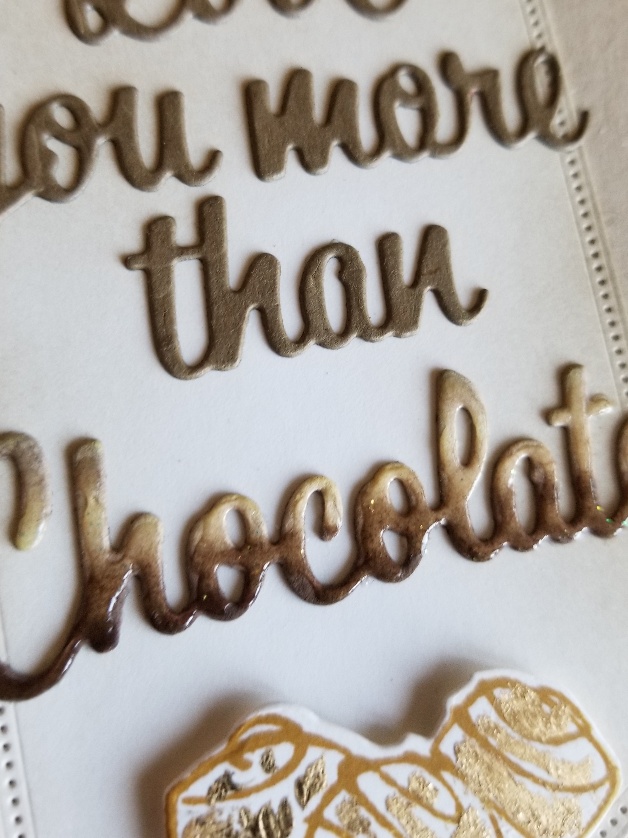
nothings better than bundle. Such an adorable set!  I wanted to make the pieces of chocolate look like they were wrapped in gold foil, kind of like the ferrero rocher (not really sure how to day it let alone spell it). Anyway, that was what I set out to do with the gilded leafing. I first stamped the outline of the chocolate and then used a little multipurpose liquid glue, let that get a little tacky and then rubbed a few pieces of gold.


It didn't really turn out the way that I had envisioned but I like it anyway. I tried with solid piece that comes in the stamp set (suppose to be the second layer) but it was too solid and you could not see the image. 


The next thing I wanted to do was make the word chocolate stand out so I watercolored it and then when dry added shimmery crystal effects for some shine! Look how gorgeous it turned out!


I really wanted the chocolate to be the star and so I kept the rest of the card pretty simple. It was such a fun card to make. I hope you have a great Valentine's day and that you get lots of  chocolate! I will be back soon with another fun card!
Don't forget about the fun new bundles and the new paper punpkin!


FREE Stencils!


Check out the new paper pumpkin! I am so excited it comes with 4 stencils and lots of great looking cards! Order now so that you can take advantage of the saleabration FREE items! 
You can always purchase a one time kit for $21.00. If you have any questions let me know.
Did you know just 2 short weeks left of saleabration? If you have been waiting to order make sure to do it now. It will be March soon and saleabration will be over. If you are interested in signing up to be a demonstrator now is the best time to join! If you have any questions or just want to know more let me know, I would love to make the whole process simple! 
Don't miss out on the adorable chick sets available now!
Have a blessed day!


Love You!


Hello! Only a few more days to make Valentine's day cards! I think that I am really stuck on using my blending brushes! I love the smooth layer of color and they are so easy to use.If you haven't ordered yet you better soon! I might buy them out! I also tried the guilded leafing for this card. So fun! Another thing to add to your list!


This card I used the basic pattern maskswreath builder diesblackberry bliss ribbonstitched so sweetly die. The guilded leafing is attached with heat and stick powder. You use that like you would be embossing. First versamark your image, then sprinkle with powder, heat (making sure not to over heat, it heats much quicker than embossing powder) then dip in your leafing. If you like a more controlled way of attaching the gold leaf just run a few pieces on at a time. It can be a little messy but that is half the fun! Enjoy the process and let me know what you think. I am hoping to make a few more cards soon to show you other ways to attach your leafing. Have  a blessed day!

Using your dies as stencils

 Have you ever used your metal dies as a stencil? Today I made a quick card with the detailed hearts die and my blending brushes. Simply place the stencil down on your piece of card stock. I just held mine in place but you could also tape it with painter tape so it wouldn't move. Then gently brush the color around. 


The sentiment is from a grand kid . I love this greeting! I cut it out with the stitched so sweetly dies and added a little texture with the stitched with whimsy die. What do you think of the bold melon mambo


I kept the card monochromatic so that it wouldn't get to busy. Added a few of the whale of a time sequins to finish the card off. I found one way to add sequins in by using shimmery crystal effects. You get a nice little shine in the middle!


Thank you again for stopping by today! Only a few more days to make your Valentine a special card!


Valentine Watercolor Wash

 Welcome back for another watercolor Wednesday! Today's cards feature a quick and easy watercolor technique, a wash. I have 2 cards that I created using different types of paper for different results. I hope that you like them! I would love if you left a comment on which is your favorite!


This watercolor wash uses shimmery white card stock. I white heat embossed the heart and sentiment from the ridiculously awesome stamp set. I wet the paper then with water painters and randomly dropped in color.


This border was created using the edge of my stitched so sweetly die and don't miss the very fun new die around the greeting, stitched with whismy die! I think these are such a great way to add texture but without adding layers!


For the next card I did my water color wash on fluid 100 watercolor paper. I did the same as the other card, wet and dropped in color. After it dried attached a scrap of detailed hearts die that I had on my desk.


White heat embossed the sentiment on black card stock and fussy cut it out. If you don't know what fussy cutting it out is, just a fancy way of saying cut it out by hand.


Used the rectangle stitched die for the watercolor paper, be ready with your muscles it is hard to get the watercolor paper thru the die machine since it is rather thick!

I am not sure who I will send these valentines to. I am blessed to have so many people in my lives that I love and whom I could send them to. Who is on your Valentine list? Don't forget to make them a card! Have a wonderful day!