I'm So Happy

Hi! I hope you are having a great week! I am really having fun with the friends are like seashells bundle. I think was draws me back to keep playing with it is how you can make the shells look so different in every card! For this card I started by white heat embossing the shells on crumb cake card stock. I did not intend to color it but then changed my mind to blend a little color with my ink blending brushes.


I used the high tide stamp set to create the sand and sea. Die cut with the stitched shape large circle to create a beach scene. Using the pinewood planks 3D embossing folder and sahara sand card stock I cut 3 equal rectangles for the background.


I finished the card with white heat embossing the sentiment on crumb cake and used a few mini dimensionals to adhere the pieces. Don't forget that saleabration and FREE stamps is almost over. Just a few more days to get the items. If you order through me please remember to use hostess code
 EYRHAMVZ
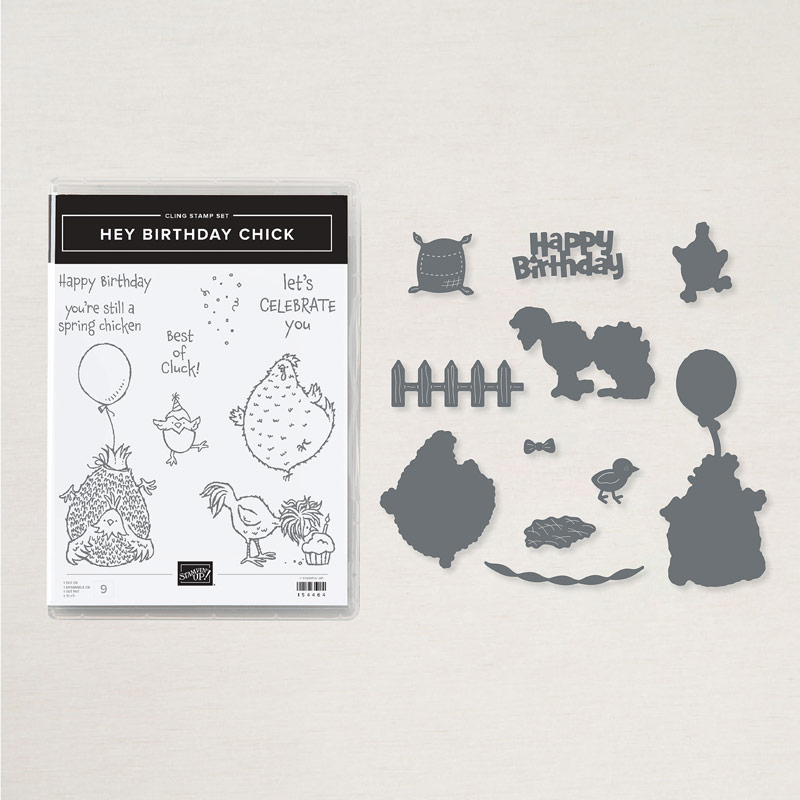
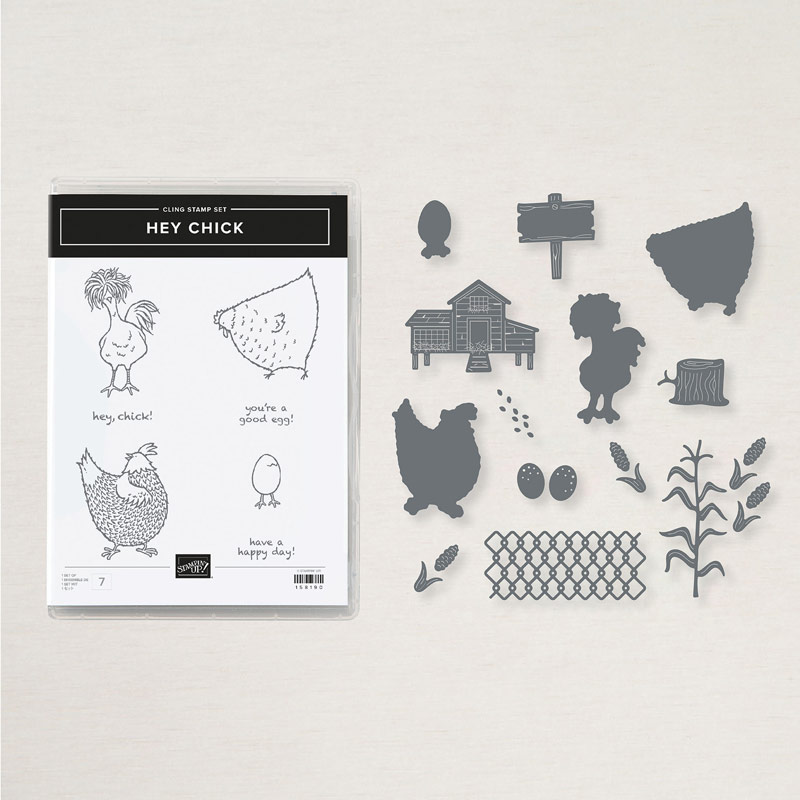
Sunday is the last day to order for saleabration. Also, these adorable chick sets are available until then. Don't miss out! You can also use your paper pumpkin orders to get FREE saleabration items. Let me know if you have any questions.


Hey Chick bundle

Watercolor Pear

 Welcome to another watercolor Wednesday! So glad that you are here. Today I have a little watercolor technique for you. I am sure most of you have done this already but it is one of my favorites. 


I watercolored the pear from the see the good stamp set. I first applied the pumpkin pie and cherry cobbler ink with the ink pads, being very careful to get just a little cobbler since I did not want to over power the pumpkin pie color. Then taking my water painter I applied ink directly to the stamp, you could also use your spritzer for this step. I then stamped it on to shimmery white cardstock. Let it dry and then hand cut it out. This is a great way to get an image appear that you watercolored it.


The background is two step blended. Tape down your basic pattern masks with painter tape and then ink blend with blending brushes apply the ink. I then took off the mask and blended the entire image to soften the colors. 


I finished with stamping the greeting on vellum card stock, make sure to wait a while since the ink on vellum takes a while to dry or you could carefully dry with your heat tool.
Let me know what is your favorite watercolor technique. Have a blessed day!

Hey Chick bundle

Simple Sunday (a day late)


Hello! Wanted to share my Simple Sunday card, however I just did not get it posted till now. This card created by accident. I love when that happens. I first start with the basic pattern masks and my blending brushes, I put down the dots and it just didn't look as I had envisioned. So then I started to blend color on top because I thought the stark white behind the dots was the problem.


I kept playing with several colors until I came up with a result that I liked. Moral is don't give up! I kept the sentiment really simple. First stamping the ridiculously awesome stamp set sentiment in momento ink. I think this sentiment is so awesome (excuse my pun) it is especially great because lent just began last Wednesday and I think a reminder of faith is what we all need.  I wanted it to pop just a little more and so with my stamp in the stamparatus I was able to stamp on top with versamark ink and clear embossing powder. A great tip for making a color embossed if you don't have the color embossing powder. When you heat it with the clear the color under shows through. 


This added a little element of shine and I love that the texture is raised. Thank you for stopping by and have a great day!


Fab Friday Challenge


Do you ever get in creative slumps? So what do you do to snap yourself out of it? I usually like to go to one of my favorite stamp challenge websites. So that is how I created this card using the design from the Fab Friday challenge. This was the sketch. So many options.


I had a few shells from the friends are like a seashell bundle that I had watercolored a few days ago after white heat embossing on shimmery white card stock. I used bermuda baybalmy blue and granny apple green ink refills for my coloring with my water painters.


I used the rectangle stitched dies and oh so ombre dsp cardstock. A little piece of braided linen trim for the layer under the sentiment. I am not sure why the bermuda bay looks so different in both pictures. I have been trying to work on my photographer skills, I guess I better keep working. If you have any tips let me know. Check out the fun cards that the designers on the challenge created. Give this sketch a try. Have a blessed day! 


Creative slump

 Hello! I am sharing with you one of my least favorite cards I have made in a while. Why you might be wondering? Well, maybe you can get some ideas from it and make a masterpiece with it.


I started with white heat embossing on vellum and using my blending brushes applied ink on the reverse side. The white frame is made with 2 of the rectangle stitched dies cut at the same time.


Hopefully you will like this card a little more than I do. I guess we can't love everything that we make. Check back soon! Lately I have been in a stamping slump, not much creativity. But I will keep on trying and I know the more I stamp the more ideas come! What do you do for your creative blocks? Have a blessed day!


Heart Garden

I think this is the last card I have to share from Valentine's Day. This was made with some scraps from another project that I was making and so I wanted to make a planter for my heart flowers.


The planter box is made with a strip of in good taste dsp and I used a few small strips for the sides. For the sentiment I stamped with basic gray and then keeping it in the same spot in the stamparatus I stamped over with versamark ink and heat embossed with clear embossing powder. That is a easy way to emboss any color ink you may have.


I kept the card pretty simple finishing it with a linen thread bow, Thanks for stopping by and have a blessed day!


Paper pumpkin, don't miss out!


Leftover hearts


Hello, I wanted to show you a quick little card I created with leftover hearts from a card I made a while ago. (Sorry about the photo not sure why it turned out so dark) I used a heart that I had punched out for my heart template. Arranged the hearts and used mulitpurpose liquid glue to attach.


For the placement of the "love" I wanted to give you a little trick that helped me to space the letters as well as make them straight. I first placed the heart from the wreath builder dies with the letters already removed. I did not attach this, I just placed it down.


I placed a small amount of the multipurpose liquid glue on the letters (patting off any excess glue) and placed them in the holes for the letters. Then gently removed the large heart, making sure not to remove the letters. The take your pick tool is so helpful for this step. 


I also wanted to share a few tags that I made with more of the scraps that I had on my desk for Valentine gifts.


The clear tiny treat boxes are the perfect size for small candy.


The stitched shaped circle die is a retired paper and the everything else is from the arrange a wreath bundle. So fun and simple. I used a box that I had found  on clearance after Christmas, it actually has a snowflake behind this tag, but I really wanted a package that would hold 4 cupcakes so it worked perfect!


Strawberries, Blueberries and Raspberries!


Hi! I finally had a chance to play with my saleabration set berry blessings bundle today. It is 12x12 paper and a stamp set. All FREE with a $100 order! If you need supplies like card stock, ink refills, adhesive just get a list together and you will be happy you did! This set and paper is adorable. I made a few 3x3 cards and a gift box. So quick and easy.


I let the paper do most of the work for me. Cutting the 3x3 background layer and then using the sentiments from the stamp set. I cut them out with many of the die sets that I have but you could also just cut them with your paper trimmer. The paper has fruit on one side and then coordinating patterns on the reverse side. So making layers was easy.


The dies I used for sentiments and other layers were stitched shaped dies and rectangle dies.


For the mini pizza box (which holds 6- 3x3 cards and envelopes) I tried my ink blending on the rough side of the box. The pictures below show the box before I put it together. How different it looked before I put it together. When I folded the box some of the edges started to pull the color away so I splattered the box with white ink refill so that it would look like it was intentional. 


The sentiment on the cover is die cut with the stitched so sweetly dies and then I cut out some of the items from the cute designer series paper.


The box came together rather quickly. I love the way that it looks with the ink blending. I think it would look great if I used a stencil also.


The box put together before adding all the extra's.


The box after I finished ink blending with my blending brushes. If you do not have them yet make sure to order them! Thanks for stopping by today!