Garden Wishes


 Hello! Today I have taken out my stampin blends to color the new garden wishes stamp set. I recently won this stamp set from the online convention Stampin' Up had before the holidays. One of the reasons I love being a demonstrator! 

Card details:
                 - Stamp main image and bee with momento black ink, this is the ink you would use if you want to color with stampin blends.
-Color with so saffron and old olive light and dark colors.
                 - Stamp the flower image on balmy blue card stock with versamark ink, this makes a nice subtle water mark.
- Die cut the images and the leaves with the coordinating dies.
-Stamp the sentiment with balmy blue and die cut with rectangle stitched dies.
                    -Assemble the card and finally add a little shimmery crystal effects to the bee's wings and the flowers. (this was really hard to get a photo of)


Thank you for stopping by today! If you would also like to get information on being a demonstrator let me know. Right now is one of the best times to sign up! You will receive over $60 worth of designer series paper! Plus the kit is only $99 and you get to pick $125 worth of product plus FREE shipping! Have a blessed day!


Watercolor Wednesday

 Hi! For the new year I have a few series that I would like to start. The first of them is Watercolor Wednesday! I love the look of watercolor and I know the only way that I can get better is to practice and so I want to share my journey with you every Wednesday. I am really excited and I hope you learn something along the way or you can always comment and let me know what I can do to improve. My first card uses the ornate style stamp set.


- I started with gold embossing the large image on Fluid 100 watercolor paper.
                     - Using painter pens and ink refills I added color to the images.
                     - I used rococo rose, highland heather, mint macaroon and daffodil delight and seaside spray.
                     - With a little scrap of watercolor paper I did a quick wash with rococo rose for the greeting from the garden wishes stamp set
                     - I mounted the watercolor panel on seaside spray that was embossed with the pinewood plank folder
                     -Behind the greeting I used some scraps from the forever gold laser dsp.

- Final touch was a few whale of a time sequins to add a little shine.


After looking at this card in a photo I realize it is missing a little more contrast to make it really pop. That is something I will have to work on. Let me know what you think,Thanks for stopping in and I hope you come back next Wednesday! 


 Coming soon! This adorable set with some really cute new dies! As a demonstrator I can preorder and so when my set arrives I will share it with you!


Gold Pear #2

 Hello! I have another gold pear idea for you. Lots of gold on this card! I did find that when heat embossing with the distinctive stamps it gives a really pretty result. Not solid but like a bunch of little dots. I really think it is fun and so different!


Steps for this card:
- Emboss in gold embossing powder the pear from see the good stamp set
                         - Using the oval in the stitched shaped dies to cut out the pear
                         - Attach the gold laser rectangle to the base of the blackberry bliss card                                                       with multipurpose liquid glue
                          - Using the sunflower dies cut the branches with granny apple green 
                            and layer behind layers
                           - White heat emboss the sentiment on blackberry bliss card stock and die cut  
                            with rectangle stitched die
-Finish with attaching the linen thread bow with a mini glue dot


Check out the beautiful new paper pumpkin! Make sure to sign up before Feb 10th!


Thank you for checking out my card for today! Have a blessed day! Stay safe and healthy!


Gold Pear

Hi my friends, I am so glad you are here! Today I am sharing a card I forgot to share before Christmas. When I saw the pear in the see the good stamp set I thought of the Harry and David mysterious gold pear. Have you seen it? When I was younger and people would send our family the beautiful Harry and David fruit box I was always so intrigued by the gold pear. Was is different? Was it special? Was it a real pear? Then when I got older I realized it was just covered in gold foil, but still thought it was pretty cool. Anyway on to the card.


I stamped the pear in versamark and then gold heat embossed it and stamped 2 more pears in pear pizzazz and so saffron. I fussy cut them out and started working on my background.


I stamped the vine looking stamp (also from the see the good set ) with versamark and heat embossed this with white embossing powder, then color with water painters and ink refills.


I used a few of the gold stems from the forever gold laser paper for an extra pop of gold. Finished it off with gold heat embossing the Christmas greeting. Thanks so much for stopping by today. I hope you enjoyed this late Christmas card post. Come back soon for cards and more with sets from the new mini catalog and saleabration.


New Mini Catalog Video


Hello, for today I have a fun little video to highlight some of the great product in the new mini catalog. I know you will want one of everything!  Best part is you can order FREE saleabration items with any $50 or more order! Enjoy!

SALEABRATION!!


 It is the best time of the year!! FREE stamps!! I love saleabration! It is a great time to stock up on all the things you use all the time, order paper pumpkin or order from the new mini catalog and with every $50 or $100 order pick FREE items!! And if you sign up to be a demonstrator you will not only get $125 worth of product (that you pick) for $99, you will get a pack of designer series paper pack for free! That is worth over $60. It includes paper from all of the color families as well as the new in colors. (This paper will be in next years catalog) Let me know if you are interested in becoming a demonstrator!

And if that isn't exciting enough now is the time you can order either of the new emboss machines! That will be enough to qualify you for FREE product also! How adorable is that little machine!?!


With all the excitement who can forget all the wonderful product in the new mini catalog? I have mailed out catalogs but if you have not received one contact me and I will get you one right away! If you order please use the hostess code YQDKKCDH and I will send you a little gift for your order. Let me know if you have troubles finding where to place the hostess code when placing your order. Thank you!

I want to share the product I am most excited about in the new mini catalog are the blending brushes!! I was able to order these early as a demonstrator and they are so amazing! I can't wait to share the cards that I make with these soft and beautiful brushes! The other new product that I am really excited to play with and share with you is the gilded leafing embellishment. You apply the heat and stick powder like you would embossing powder and then rub the gold flakes over the embossed area.  Leaving a beautiful golden shine. I hope to get a chance to play with it soon and share it with you. Check back soon to see the paper and stamp sets I am most excited about. Thanks again for stopping by and don't forget to sign up for paper pumpkin for the Valentine kit. Also, don't forget that if you buy more than 3 months subscription you will qualify for saleabration items!  Let me know if you have any questions. Have a great week and I hope you come back soon.

                                                                     Blending Brushes


                                                           Gilded Leafing Embellishment


                                                                 Heat and Stick Powder


Happy New Year!

 Happy New Year friends!

 Sorry for my long absence. I have been enjoying family and taking care of so many things. I went to the mountains for Christmas, which was wonderful and such a nice break. We even had light snow flurries for Christmas Eve! Now with the New Year I am so excited to stamp! Especially because it is my favorite time of the Stampin' Up calendar, saleabration! If you are not familiar with it, for every $50 you spend you get to pick an item for FREE from the saleabration catalog. If you would like me to send you a catalog let me know. Also, the new spring catalog is available. So much goodness in these 2 catalogs! 


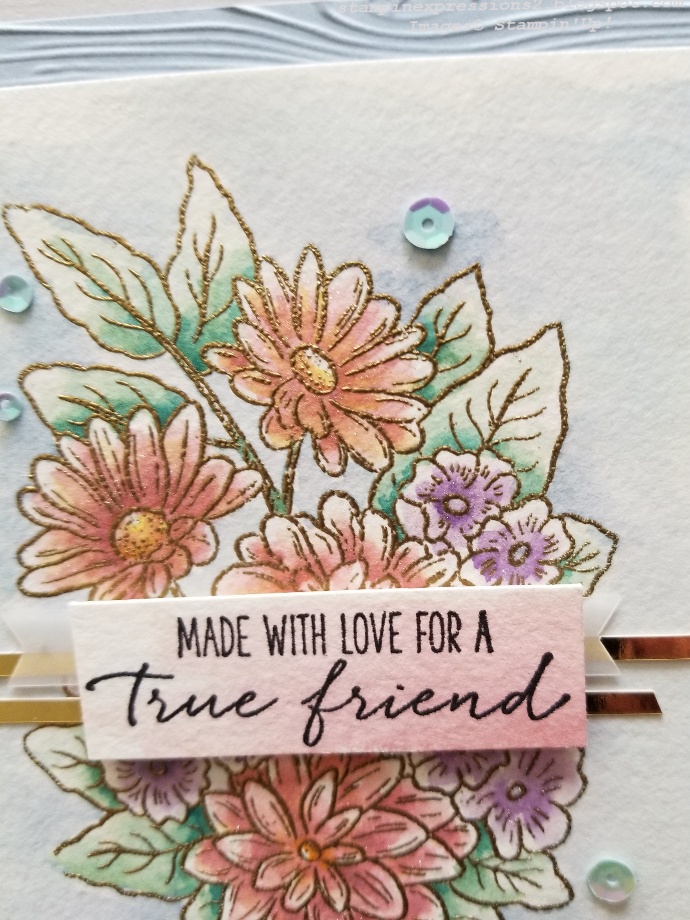
I have a couple of cards I made a while ago with but forgot to share with the see the good stamp set. I really love this stamp set. The first card also uses the scripty embossing folder (another one of my favorites). After I ran it through my die machine I lightly rubbed the mossy meadow ink pad on top for extra texture.

 
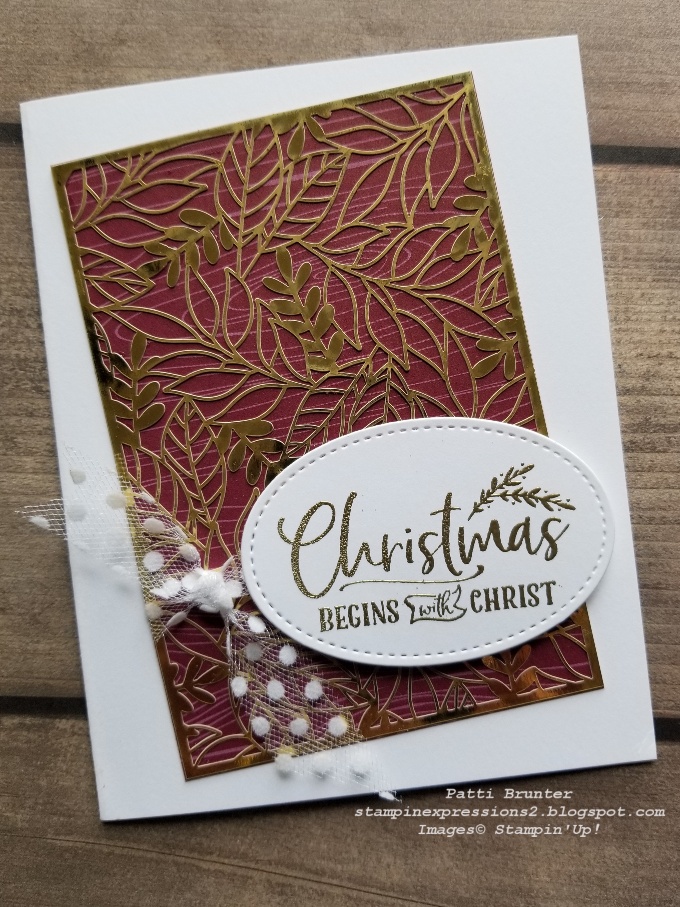
My next card uses one of my favorite colors, blackberry bliss! For the pear on this card I stamped with blackberry bliss and then used a sponge dauber to add a little balmy blue. The colors mixed so beautifully.  The background is done with the basic pattern decorative masks, which I lightly sponged with blackberry bliss ink. To soften this piece when I removed the mask I sponged the left over ink on the paper.

 Here is a close up of the colorful pear!


I continued to use the decorative masks for my next card.  For this background I used my ink pad to directly apply the ink. If you would like to try this just lightly tape your mask to your paper and lightly rub the ink pad into the areas that are cut out from the mask. This gives such a fun new texture. I also splattered ink from the mossy meadow marker. 


I stamped the pears in pear pizazz, so saffron and cherry cobbler and then cut them out by hand. The leaf sprig behind is from the sunflower dies with white card stock and then I sponged ink lightly. The greeting is from the free as a bird stamp set


Thank you for stopping by today! I hope you all had a safe and happy New Year's Eve. 2021 is here and I know it will be a great year! So excited to share with you the new product on Tuesday! If you would like a catalog please message me and I would love to send one to you. Also don't forget that the paper pumpkin for Jan will be available until Jan 10. Speaking of paper pumpkin, with saleabration it is the best time to buy the multi-month subscription. Because when you spend over the $50 you get saleabration items. 3 month subscription qualifies you for one item, 6 month you can pick 2 $50 items or one of the $100 items, and with the 12 month you can get 4 $50 items or mix with a few of the $100 items, plus you then qualify for $22 free product because it is considered a party! What an amazing opportunity! So check back on Tues for some of my favorite new items! Have a wonderful day!


Tomorrow is the last day to take advantage of the great closeout! Don't miss them. 


Get it now before it is gone!


Hello! So glad you are here! Check out on the website the amazing deals from Stampin' Up, many items are such a great deal!  They will go quick so get them while they are still available. If you have any questions let me know. Also, don't forget about the great paper pumpkin! Only 2 days left to order this kit.  Speaking of paper pumpkin it is a great gift for your favorite stamper.  You can order one month or more.  The more months you purchase the better the deal.  Let me know if you have any questions. Such a fun gift for your favorite crafter for the pandemic. Have a blessed week and stay healthy! I will be back soon with a fun card idea. Thank you for stopping by!


SALE TODAY ONLY!

 Hi Friends! How are all of you? I am posting this a little late but wanted to let you know about the great sale that Stampin' Up is having today only! 10% off most items in the catalog. (however not including the holiday mini). If you check on my website you will see the things that are discounted. 


Christmas begins with Christ


Hi and welcome to another card in my quick and easy Christmas card series. Today's card turned out so pretty. Don't you love it when you create something and it surprises you and you end up liking it. I started with this greeting from the for unto us stamp set embossed in gold and cut it out using the stitched shape dies cut it out. I knew I wanted to use the forever gold laser cut dsp but I struggled with what to put behind it.


I always love dark colors behind and the neutral dsp had just the right color! A little piece of whisper white polka dot ribbon was just right because it didn't add a lot of thickness. Thanks for stopping by today and I hope you share what you are making for your Christmas cards!
If you are struggling for ideas or would just like to create with everything done for you order the paper pumpkin today. You have until Nov. 10th to get this kit.


Never give up!


Hello stamping friends! So glad you here! Today's card was a little of a mess but I do like the way that it turned out in the end. I learned to not give up! I started with the winter woods stamp set embossed in white on watercolor paper. Using my water painters I added color with my reinkers. The colors were not exactly what I had in mind but I kept letting it dry between and adding more layers of color. At one point I almost was going to throw it away, but I kept trying. Finally, it looked pretty good to me.


I added some white ink splatter and also drops of water that I paper towel dried off to add some texture. In the end I think it is really a fun card. The background paper is from the snowflake spendor dsp and the greeting is from the for unto us stamp set which I white heat embossed. Thanks for stopping by. I really learned so much from this card, not to give up and how forgiving watercolor is. Have a blessed day!

Quick Ornament Card


Hi and welcome back to my series of quick and easy Christmas cards, that will be easy to duplicate to mail to family and friends. I started with brightly gleaming dsp, this ornament pattern is one of my favorite. I used the rectangle stitched dies for the sentiment, background layer and the ornament paper layer. 


To make the sentiment pop a little more I used a piece of mossy meadow card stock cut with the stitched so sweetly dies. The sentiment is from the for unto us stamp set which I gold heat embossed. I love the rich colors of this card. So quick and easy. Thank you for stopping by today and I hope you come back soon.  Let me know what you think of this card in the comments below. Have a blessed day!


Adore Him!

 Hello and welcome to the quick and easy Christmas card series. Heat embossing is always a quick and easy technique!  This tree from the winter woods stamp set looks gorgeous heat embossed in gold.


The sentiment is from my favorite for unto us stamp set. I also gold heat embossed it and used the rectangle stitched dies to cut it out. The background layer is from the in good taste dsp. Such a fun textured looking paper.


The star was on my desk from another project that I did not use. It is from the peaceful nativity bundle. This die set has some great images and I love this star! Thank you for stopping by to see another one of my quick and easy Christmas cards. I hope this gives you some great inspiration to create today! Have a blessed day!