Hand Stamped Sentiments Challenge #392


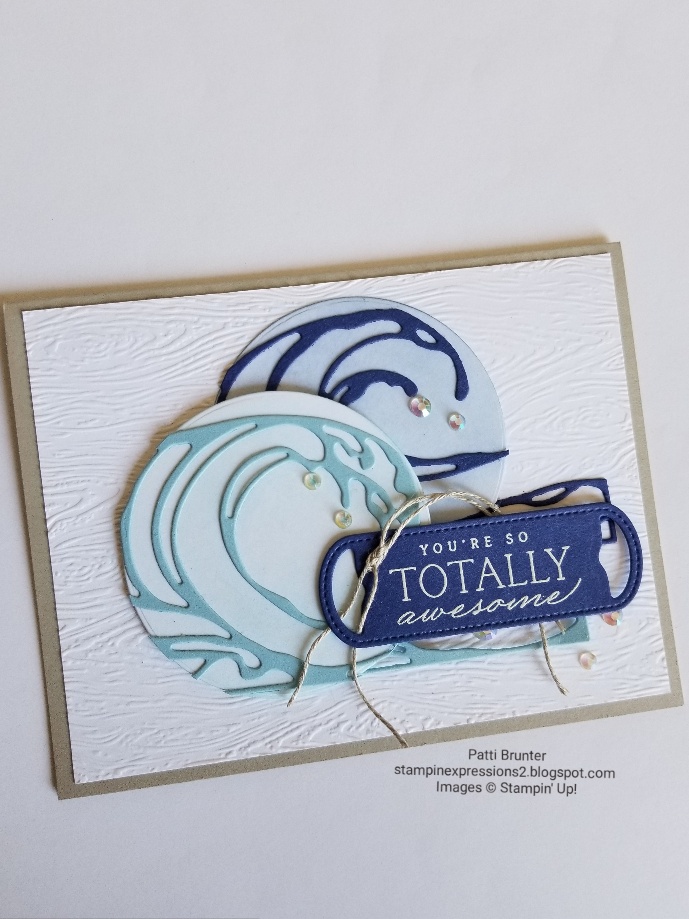
Hello and welcome back to another hand stamped sentiments sketch challenge. I had so many ideas for this sketch, I really love it! I decided to turn the sketch on its side for my card. Remember you can adjust the sketch, use your creativity! I used the waves of inspiration bundle for my card. The dies have 2 beautiful waves that I cut with balmy blue and starry sky cardstock. I adhered them to a layering circle die cut with basic white cardstock. Then cut off the part that didn't fit on the circle. I used the timber 3D embossing folder on basic white cardstock. When I went to adhere the circles I decided to also adhere part of the wave that I had cut off. I like how it kept the motion of the waves going. The sentiment is white heat embossed on starry sky and the waves dies to cut out. I finished it with a knotted linen thread and a few iridescent rhinestone jewels.


I thought the jewels would look like water drops. Thanks so much for stopping by today! I hope you get a chance to join in the fun with the hand stamped sentiments challenge. I look forward to all the creative ideas! 


You're kind of a Big Deal!


Did you know that if you emboss on vellum (or stamp) you can color the back side? That is what I did with the waves of inspiration bundle today. I white heat embossed the large wave and then used my blending brush to swipe bermuda bay and balmy blue ink on the reverse side. I love the way that the wave looks foamy and the color popping through. Adhering vellum is sometimes difficult and I feel the easiest way is to create a frame. So I used 2 of the stitched rectangle dies and cut a frame with bermuda bay cardstock. I also adhered a piece of basic white behind the vellum so that I could use dimensionals to attach the framed piece to the card base.  
 

For the first half of the sentiment I used a trick I saw Jennifer McGuire use, she saves her thin scraps and adheres them to the back of the sentiment strip so that you do not need dimensionals that small.  This is a great tip! I adhered with multipurpose liquid glue , 4 layers of scrap paper, cutting between each one so that it would not show. Then I attached the sentiment strip to the cloud that was die cut from the waves of inspirations dies. The bird is also from the waves dies. The sentiment is from the whale done stamp set.
 Thanks so much for stopping by today.


Free Shipping Today Only!


Don't miss out on Free shipping today only for orders $75 or more! Remember you can take part in some of the amazing deals in the soon to retired list, buy one get one half off for the kits or something from the current catalog! Place your order today! Thank you!


Do you like to color?


Have you ever been in the mood to just color? I do all the time and one of my favorite things to color is this beautiful sunflower from the celebrate sunflower stamp set. I decided to watercolor for today so I stamped the sunflower on shimmery white cardstock with stazon black ink. After a few minutes of letting it dry I used my waterpainter and several ink refills to add color. For the petals I used daffodil delight, calypso coral and cherry cobbler. For the center I used daffodil delight, so saffron and crushed curry. After it had completely dried I used the sunflower dies to cut out. I black heat embossed the sentiment on a piece of basic white cardstock and wondered what to do with the sunflower. ( I like to heat emboss the sentiments, it never fails I always smear it and this way I can't)  I really wanted the sunflower to be the star and didn't want to add leaves that would take away from it. So I used the basic border dies to cut a piece for the where the sentiment was stamped. Used the timber 3D embossing folder to add texture to the piece. Then with the same basic border die cut a piece of perfectly penciled designer series paper to place under. The sunflower is adhered with dimensionals. Last I added a few basic rhinestones that I colored with black stampin' blends


I hope you enjoyed listening to my step by step process of how this card was created.


If you like to color with any type of medium the celebrate sunflower stamps are a must have. The large flower image is great for practicing all types of coloring.


Thanks for stopping by!


Hand Stamped Sentiments #391


Welcome to another fun hand stamped sentiments challenge! Check out the beautiful snapshots on this inspiration board. I was so torn with how to showcase these colors and images. I decided to keep it real simple and my inspiration came from the top left hand picture of the sun! I am really into my basic border dies right now and they are what I created the card around. 


First I needed to create the gorgeous sun image. I began by stamping the sun from the paradise palms stamp set with versamark ink and then clear embossed it. Then I pulled out my blending brushes and daffodil delight, crushed curry, calypso coral and cherry cobbler ink. When I ink blended this I used a very light touch so that the colors almost melted into each other, I began with the daffodil delight and went farther out towards the edges overlapping the colors. Then I went back over all the colors again finishing up with the daffodil delight. Do let the ink dry a while before stamping the sentiment. since this has many layers of ink it will take a little while to dry. The sentiment is from the sending smiles stamp set and I embossed that with black embossing powder to really make it shine.(The black and white embossing powders come in a set together.)


For the layers of clouds I die cut 3 rows and off set them a little so that they would not look identical.  I used dimensionals on the first and last layer of clouds. Finishing off with my favorite, iridescent rhinestone basic jewels and a little wink of stella glitter brush on the tops of each of the clouds. (Sorry I couldn't get a clear pic of the shine from the wink of stella)
I am so excited to see what catches your eye on this inspiration board. I know that everyone will see something different! Have a blessed week!


Calling all Nautical Lovers!


Check out the new paper pumpkin! I know many of you are like me and love the beach and all things with a nautical theme. You will not want to miss this amazing new kit! Plus all subscribers will be entered into a chance to win one month of paper pumpkin for FREE! Order today. Kit includes:

 9 Cards, 3 of each of the 3 designs

  • Sending Good Thoughts Photopolymer Stamp Set
  • Bermuda Bay Classic Stampin’ Spot®
  • Printed dry-embossed card bases
  • Printed envelopes
  • Printed die cuts
  • Twine
  • Mini glue dots
  • Dimensionals

Card size: 4-1/4" x 5-1/2" (10.8 x 14 cm)

Coordinating Stampin’ Up! colors: Balmy Blue, Basic Gray, Bermuda Bay, Fresh Freesia, Pacific Point, Poppy Parade


Scrapbooking


Hello! I saw on instagram a few Stampin' Up demonstrators who have been posting scrapbooking pages for the last 7 days and I was so inspired I had to create one. My first love was scrapbooking and then I started to create cards and that took way less time and so I started to scrap less. I realized making this page how much I missed it (and how rusty I am since it took me a few hours just to make one page).  I started with this photo that our family had taken many, many years ago and I immediately thought of the paradise palms bundle.  A few of the items that I used are either retired or from old paper pumpkins.  The palm trees and dies made this page pretty simple, just the layout took a while. I think because I am now use to creating on a small card front instead of a 12x12 page. However, I am really happy with the end results. The other current product I used was the basic border dies, rectangle dies and waves of inspiration dies
 Thank you to those demonstrators who created for 7 days straight, I have loved seeing your creations. I apologize for not giving credit to those demonstrators, I am not exactly sure of everyone who was contributing and I don't want to leave anyone out.   You have all really inspired me to create more pages. I forgot how much I love to make pages. A huge thank you!


Photo was taken by Lorin Backe Photography.


Paradise


Happy Monday! 
Waves of inspiration, paradise palms and the fern 3D embossing folder all work great together! They all have a beautiful beachy feel. To frame my sentiment in this card I first die cut the from the layering circle dies before running through the ferns embossing folder. This is an important step, because if I embossed it first and then die cut the circle it would have flattened out the beautiful ferns. The pelican is stamped with memento ink so that I could color it with crumb cake, bronze and ivory Stampin' blends. I used many of the amazing dies for this card. I am obsessed with the layer on the clouds, such a fun addition to just plain clouds. I debated whether or not to add the birds, however I think they add a fun element to the card. Let me know what you think?


Thanks so much for stopping by to take a look into a little beachy paradise. Don't forget to order from the soon to be retired Jan-June mini catalog. There are many items that are greatly reduced in price. Also, only a few more days to order the June paper pumpkin. Sure to be a fun one to create this summer with friends and family! The buy one, get one half off is still going on for all Stampin' Up kits. Check out the website to see the variety, so many cute additions. They are great for gift giving! While you are looking at the new kits also check out the new branded merchandise. Something for everyone!