I did it!


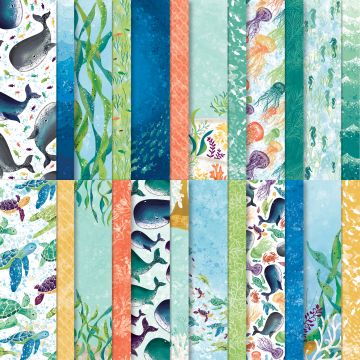
Hello! Well I did it! I cut up my whale of a time dsp. It was a little scary but I am so glad that I did because it made such a cute card. This card started with a piece of fluid 100 water color paper and I used the wide water painter to add stripes of several of the different blue colors. Then when it was dry I spritzed some of the white ink refill on the paper.


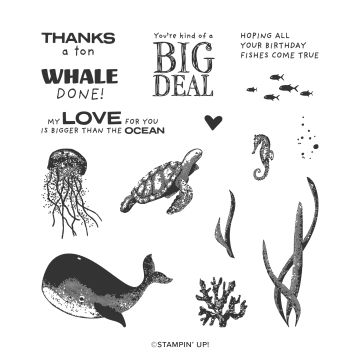
I used the stitched shape dies largest circle to use for the background for my whale. I wanted to keep him a little neutral and so I stamped him in basic grey and then using the whale punch, punched him out.  


I stamped the greeting and using the so sentimental dies cut that out. It fit perfect! Don't you love when that happens! I added a few of the holiday rhinestones, which went so nicely with the colors of this card. They are so much more than just holiday.  
Thank you so much for stopping by and I look forward to more ideas with this wonderful suite! Have a blessed day! 

  WHALE DONE BUNDLE (EN)


WHALE OF A TIME 6" X 6" (15.2 X 15.2 CM) DESIGNER SERIES PAPER


Whale done!


Hi! Thank you for stopping by today! I have really been on a color journey lately. Today's card is really an example of that. I finally had a chance to play with the whale done stamp set. I have to tell you I was a little intimidated with all the wonder ideas out there with this set. Does that ever happen to you? You love a set and then get it and then because you have seen so many people using it you are nervous yours will not be as good or you don't want your card to look like someone else's? So I just did the opposite of everything that I had seen and used bright bold colors. I did not use any of the dsp because I love every piece and don't want to cut it up. But I will! 


I grabbed a few of the brights colors and just started to stamp. As you can see some of my stamping was not the best. Remember when using the photopolymer stamps you will want to stamp a few times on scratch paper and rub your finger across it to get it ready to stamp. Not sure why they suggest this but the ink does go on more smoothly. 


After stamping the images I stamped the greeting in black ink, I think that stood out nicely.  All in all I think this card is really fun. I will continue to play with the set and try and not look at all the amazing projects out there.  Social media can be a good thing and a bad thing. Let me know what you think of this card? Have a blessed day and go be bright and bold!

WHALE DONE PHOTOPOLYMER STAMP SET (EN)


Awesome!


Hi, this is just a quick card for a quick post! I had fun creating this watercolor wonder. It is so fun and easy to do. No skills necessary! If I can do it you can to! Start with a sheet of water color paper (Fluid 100 is great!) Wet the entire piece with a water painter and then using ink refills dab small amounts of ink on the wet paper. If you do not have refills just take the ink pad and swipe it on one of your acrylic blocks and use that ink. If you do not wait for the paper to dry between adding each different color you will get a nice mix of colors as the water moves. So fun and it turns out different every time.  If your color is not moving add a little more water. One thing to remember is that the color will be lighter when it dries. So if you would like it more vibrant add another wash of color. I then stamped the sentiment with black ink. You might want to use a stamp positioner for this step.  Since the water color paper has so much texture you might need to stamp it a few times to get in all the little nooks and crannies.  
Thank you so much for stopping by today! I hope you give this fun technique a try! Have a blessed day!


RIDICULOUSLY AWESOME CLING STAMP SET


WATER PAINTERS


FLUID 100 WATERCOLOR PAPER

You got this!


Hi! You got this! Something I think we all need to tell ourselves everyday lately! Times are so strange and so much is different in out world. When I read this card it reminds me that I only  "got this" through the grace of God. It is by His hand that I am able to get through everyday and I know that He is in control. So no need to worry or stress. I made this quick card with more masculine colors because I can never have enough men cards. I kept it simple and I love the colors together rich razzleberry and crumb cake.. I heat embossed the stars in white on white card stock and then ink blended the colors.


I wrapped a piece of linen thread around a few times and mounted on a piece of dsp from the neutral colors. A quick and easy card that you could do with all the greetings in this stamp set. Thank you for stopping by and if you are having a hard day remember you also "got this", take a deep breath and stamp a little.Have a blessed day!

RIDICULOUSLY AWESOME CLING STAMP SET


Order your paper pumpkin here! You will not want to miss out on this wonderful fall kit!

Sunshine for the TGIF #277 sketch


Hello and welcome! Today I played along with the card challenge over at TGIF card challenge. They have a fun sketch that you could really come up with a million different card ideas. Since I had the Ridiculously Awesome stamp set on my desk I made a quick watercolor wash with pumpkin pie, crushed curry and daffodil delight. After it dried I added a quick swipe of frost white shimmer paint. It is hard to get a picture but in real life it is so shiny and shimmery!


The sentiment I stamped with versamark and white heat embossed on vellum.  The only problem with vellum is trying to hide the adhesive and so I wrapped it around the watercolor paper and adhered to the back. A quick and easy fix! I want to use the flowers for every season gems on all my cards and so I had to add a few to this card. I am very fond of the clear gems. Check out all the amazing cards created by the artist on their website. Thank you so stopping by today and I hope you come back soon! Have a blessed day!


Sending sunshine


Hi! Today I would like to send sunshine, but if you are living in Southern California where I am, you may not want it! We have been in a heat wave and more sunshine just means more heat. So luckily like everything these days it will be virtual sunshine. For the card today I decided to play with watercolor paper, ink refills and water painters (aquapainters renamed). It was fun to just play and not put any pressure on it looking any certain way. (which is a little hard to me)


This is the sun that I created. I know a preschooler could have made this, but how fun is it to just be a kid again.  I decided to cut the image in half after it dried to create 2 cards with the one painting.


The first card was kept very simple. I love the new bumblebee ink and paper color. I used the stitched rectangle dies for the greeting that I adhered with dimensionals.


Here is a close up of the greeting.


For the second card I just had a picture of the close up. I am not sure why I did not have a full size picture. Luckily it is the card in front on the first picture.  For this card I mounted it all on a piece of whisper white and cut out the greeting. I stamped the "shine" around the word "sunshine" and then mounted that with dimensionals also.  I really had a fun time created these cards. I hope that you like them and give some time to create your own sunshine. Plus it is not hot and do will not get sunburned. Stay cool if you are in So Cal and if not enjoy your cooler weather. I am looking forward to fall! Have a blessed day and thank you for stopping by!


Which color do you prefer?


Hi! A quick post today to say which color do you prefer? When I get stuck in a rut (can't seem to stamp anything that I like) I just take my images and try them in different colors. So I did that with the new See the good stamp set. I stamped the artichokes in several colors (excuse the highland heather one). So which color do you like? It is amazing how fun it is to stamp things with colors you would not typically think.


Next I stamped the pear. For this one I stamped the first one full strength and then stamped it again without reinking. It is really fun to see how different the second generation stamping is. Our ink pads have such a wide array of colors, if we only take the time to play with them. Next I would like to stamp these both with a few different colors on the same image. I will need to use my stamp positioner for that since this stamp set is in red rubber. Let me know which of the pear colors you like the best. Thank you for stopping in today. And remember you are the artist and can make anything any color you pick.  Enjoy the process and take the chance to find a new color you like! Blessings!


Artichoke thanks


Hello! So glad you are here! I wanted to share with you another card idea with the see the good artichoke. I have really been having a lot of fun with this stamp set. I have been trying many color and techniques with the pear and the artichoke. 

I also tried to make a fun new background. I die cut a few branches in pear pizzazz and then glued them on to a strip of pear pizzazz then ran the entire piece through with the subtles embossing folder. I think this adds a fun element of texture to the card.


The artichoke was inked with pear pizzazz and a little old olive and then used a aqua painter to blend the colors a little. When using this technique you will lose a little of the detail but I think the painter look is so fun and unique. Every time you stamp it, it looks different. 


Thank you for stopping by. I would love any comments you might have!  Thank you! God bless!
                                                                                      

                                                                                             SEE THE GOOD CLING STAMP SET    

                                                                               See the good stamp set


Gather together belly band


Hi and welcome! So glad that you are here. I wanted to share with you today a quick little gift that I made for one of my customers. I made a few cards with the gather together bundle and placed them, along with envelopes in our acetate card boxes. Then I made a belly band to jazz up the outside.  A belly band is a quick way to add a greeting or a decoration to the outside of a box.


I measured 2, 2" strips of dsp and adhered them to each other. I connected the long strip without attaching it to the box, but so that it can slip off and on easily without tearing it apart.


I used a negative cutout from a leaf that I had die cut earlier, for my focal point. Added a few scraps I had sitting on my desk and a little bow of linen thread and my box was completed.


The greeting is from the see the good stamp set. I just colored the "thank you" with pear pizzazz marker and stamped on whisper white.


This is a picture of just the belly band without the acetate box and cards. The acetate boxes are perfect for 5 cards and envelopes. I sure hope that my customer enjoys this fun gift. Thank you so stopping by today and I hope you have a blessed week!


GATHER TOGETHER BUNDLEClick here to  order the gather together bundle

Check out the new paper pumpkin! 

  • Kit contains enough supplies to create 20 cracker box treat packages.
  • Each cracker box treat package can be customized to celebrate Halloween, Thanksgiving, the autumn season, or all three!
  • Coordinating Colors: Bumblebee, Basic Black, Cajun Craze, Cinnamon Cider, Mossy Meadow, Old Olive, Pumpkin Pie, white
  • Order here today!

Blessed and grateful!


Hi! Welcome today! I have been a little busy lately, my son and his wife had their first baby (my first grandchild) last week and I have been so busy getting all the info and pics!  With all the COVID restrictions we weren't able to be at the hospital but thank you God for facetime and texting! He is 2 weeks early and still 8 lbs 11oz. A healthy and blessed baby he is and we are all so grateful and thankful! He is perfect in every way! 
I did have time to stamp a quick card and since I had so many paper scraps from the TGIF challenge a few days ago I made another background. Love this!


I stamped the artichoke with old olive and then used a dauber to sponge a little blackberry bliss. I used my aquapainter to add a little water and stamped it on shimmery white paper. Such a fun technique! I stamped the greeting with blackberry bliss.


I used the stitched so sweetly dies (love them!) and used the pinewood planks EF after I adhered the stripes of scrap paper. I think I am a little obsessed with this set now.  Thank you for stopping by today! I appreciate your patience since I have not been posting anything. Have a blessed day!


New Holiday Catalog!

08.01.20_HEADER_AD_CATALOG_GOLIVE_NA


Enjoy these wonderful, quick videos that Stampin' Up has put together for you to see just a few of the new fun things in the holiday mini catalog. If you would like a catalog let me know and I will send one out to you. You can also see it online at the Stampin' Up website. Have a great day and get your wish list ready because there are a lot of great things to play with!

Don't forget to order the new paper pumpkin by Aug 10th. You can order here


Artichoke card!


Hi! How are you today? I had a chance to play with the artichoke in the see the good stamp set. I was trying to put a little rich razzleberry with the old olive to give it some dimension. I love the texture these stamps show to the artichoke and the pear. So fun!


For this quick card I stamped the artichoke with the pear and then wiped the stamp clean and added the razzleberry in just a few spots with a sponge dauber. I stamped that directly on top. This step would be easiest with a stamp postioner since the stamps are red rubber and you are unable to see over them.  I stamped the greeting on top with momento black ink.


This stamp set also has a beautiful branch stamp that I stamped with versamark on old olive card stock. I am really loving this stamp set! Check it out! Stay tuned for more fun cards made with this set. Have a great day and enjoy the day! Thank you for stopping by.
Click here to order See the Good stamp set